
Mastering the Precision Pixie Cut: A Step-by-Step Professional Guide
Why the pixie cut is a "business builder" for stylists and a bold, personalized choice for clients. Focus on the importance of shaping and personalization over just "cutting hair short".
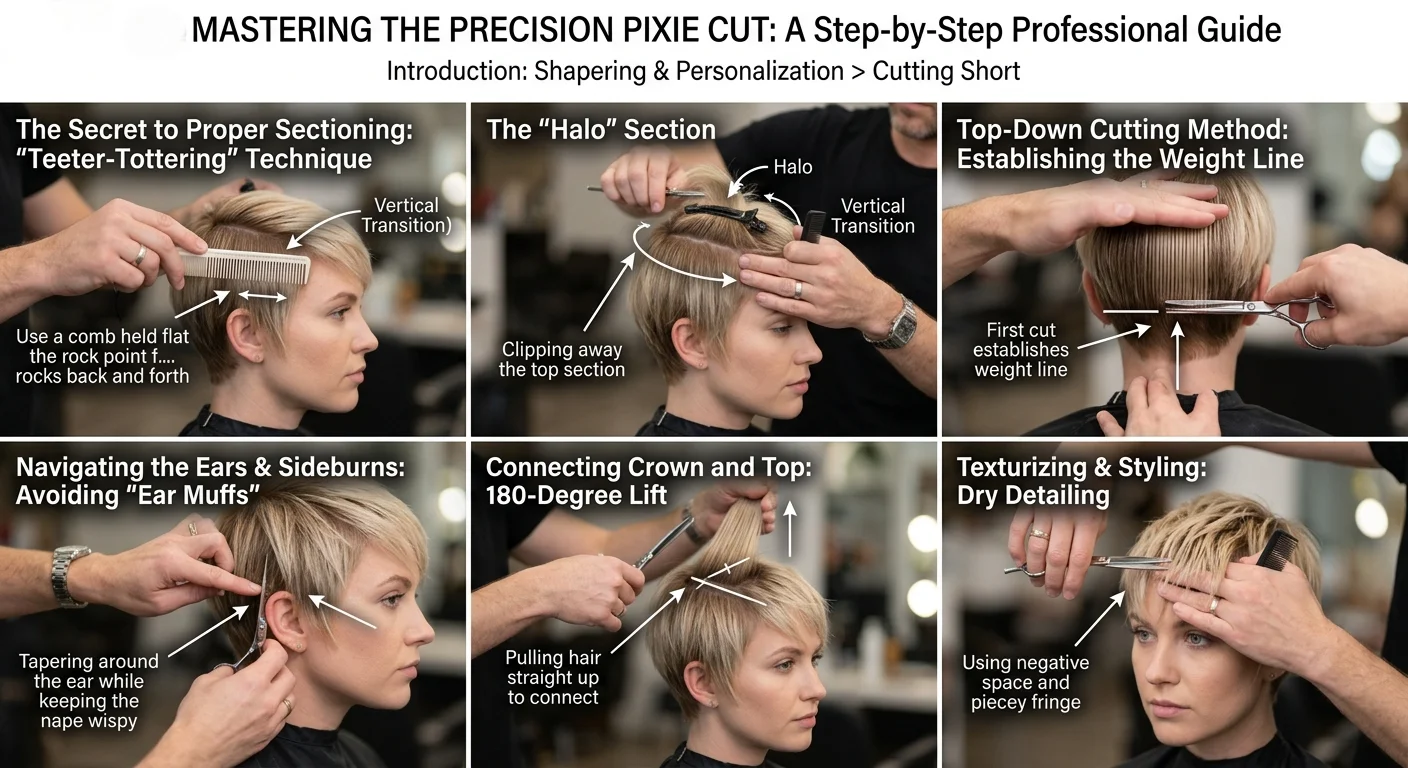
The Secret to Proper Sectioning: The "Teeter-Tottering" Technique
Finding the Vertical Transition
Use a comb held flat against the head to find where it "rocks" back and forth. This precise rock point is critical for separating your vertical and horizontal weight distributions.
Mapping the Head
Note how the vertical transition is higher at the recession and drops down toward the crown. Understanding this skeletal mapping prevents you from cutting too high into the temporal bone.
The "Halo" Section
Clipping away the top section to isolate the vertical transition. This ensures your canvas is clean before any length is removed.
The "Top-Down" Cutting Method vs. Bottom-Up
Why Top-Down?
Establishing the weight line first ensures it doesn't sit too high or too low once the cut is finished. It gives you immediate visual control over the final silhouette.
Finger Positioning
Mimicking the head shape by angling fingers so the longest point is at the fingertips, tapering shorter toward the nape. Your fingers must act as a flexible extension of the client's bone structure.
The Center Back Start
Beginning with a center vertical section and pulling hair straight out horizontally. This creates your master traveling guide for the rest of the posterior section.
Navigating the Ears and Sideburns
Avoiding "Ear Muffs"
The importance of not over-directing hair back, which creates unwanted weight behind the ear. Over-direction here is a common trap that results in a heavy, dated look.
The Tapered Ear
Using a tighter angle and diagonal forward sections to clean up the area around the ear while keeping the nape wispy.
Sideburn Options
Keeping fingers at a longer angle to maintain length for a wispy, textured look that frames the face perfectly.
Connecting the Crown and Top
The 180-Degree Lift
Pulling hair straight up to connect the top length to the established weight line. This elevation maintains internal softness while eliminating harsh weight lines.
Managing Length
Explaining why cutting straight across naturally leaves more length in the front. This inherent geometric balance is what creates that coveted piecey fringe.
Cross-Checking for Balance
Using diagonal back sections to check for symmetry and remove "unwanted corners". Never skip cross-checking; it is the difference between a good haircut and a flawless one.
Preview Your Pixie Cut Now
Texturizing and Styling for the Perfect Finish
Blow-Drying Strategy
Keeping hair below the weight line flat with a comb while using a round brush above the weight line for volume. This creates a beautifully balanced, modern head shape.
Dry Detailing
Using the "invisible ones" technique—sliding shears up the hair strand to create "negative space" and piecey fringe. This texturizing method allows the hair to move naturally when dry.
Product Application
The "shoe shine" technique for applying pomade to ensure ends are fully saturated without trapping loose hair. It adds that final professional separation and shine.